Hello and welcome to my Blog, and the journey I take through the world of stop-motion animation.
The magic of animation has been used for years by various artists and has provided wonderment and entertainment to the media industry and their viewers. From stop-motion animation and other techniques, allow individuals to express themselves through a new and creative way. Bringing life to drawings and inanimate objects alike we have been given such films as: The Nightmare Before Christmas and Wallace & Gromit. Although this is well known for being a painstaking process, the result is beautiful and extremely enjoyable to watch by children and adults alike.
Through this journey I have learnt the history of stop motion animation, the origins and earliest known forms of non-camera animation. I have also experimented in some of my own techniques such as stop motion with objects and with people: the use and significance of a chroma key: general animations and the use of sounds.
Here is my first attempt at stop motion animation using a person: Enjoy.
This video is very staggered, it was hard to create seamless movement alone, however I believe I got the basics right. Another problem with this video is that the flash was on during filming, meaning the images are differently lit, further enhancing the transition between frames. This video was created using a Sony A200 camera, and windows live movie maker.
Stop motion animation, also known as, stop-frame animation, is a very basic form of animation. Commonly applied to make everyday mundane objects appear to be alive. Tiny movements and individually photographed frames provide this illusion. 'When the series of images are put together and played back in a continuous sequence, the magic happens pg58.'Fallman (2011)
There are many different forms of stop animation:
Classic Drawing Animation
Classic drawing animation has been around for centuries and has provided children and adults alike, much entertainment and wonderment.
Model Animation
Stop Motion Girl Dreaming.
Some quick background information: Eyal Landersman, was the photographer for this video. Landersman won a grammey for this video in 2009 and was nominated for in 2010 for this piece titled: Her Morning Elegance. 'Her Morning Elegance,' featuring Shir Shomron, achieved popularity on YouTube receiving over 20 million views. Lavie produced and co-directed the video, which was shot in 48 hours without a break.
Stop Motion- Puppets: Coraline.
Coraline is a stop-motion film released in 2009, and directed by Henry Sellick. Coraline uses the old technique of taking a shot and then moving the model ever so slightly again and again creating the illusion of movement. Coraline uses 24 frames per second, and each shot has around 20 small pieces moved every time. It is a very long process but very rewarding at the end of it. As an example, 24 seconds of film will take an animator around 3 and a half weeks to shoot, because of this multiple identical sets are made so different scenes can be shot at the same time. The process starts with them animating the voices of the actors first so animators know when to move the mouth a certain way and synchronize the character to the voice. An animator working on Coraline said that some of the hardest shots are when there is no dialogue, because you have to act through movement, and emotions of the character.
To animate the model, it must be very flexible. The skeleton must be strong and each joint must be able to move and hold in the desired position of the animator. Each model also has an interchangeable upper part of the face and the lower part, so that there is a vast amount of emotions that the animator can communicate through.
Everything is made by hand, from the walls to the floors of the environment to the sky outside. Everything is created. Costumes are duplicated a lot of times as are sets and hands. The detail can sometimes be overwhelming but the outcome is worth it.
'Everything was touched by hands and hearts.' Henry Sellick
What is it:"Phenakistoscope" originates from Greek roots meaning "to cheat", as it deceives the eye by making the still images appear to move. The best animations for a Phenakistoscope are cyclical, for example a horse galloping.The Phenakistoscope was invented in 1832 by a Belgian Physicist known as Joseph Plateau: Inspired by faradays wheel. 'The Film before Film.'A Phenakistoscope uses a mirror to create the illusion of continuous movement.
Here are some examples of the Phenakistoscope in action:
How to Make a Phenakistoscope: To make a Phenakistoscope, first you need to make a check list of what you need which were:
Stiff Paper.
Drawing Paper.
Drawing Compass.
A Protractor.
A Pencil.
A Ruler.
Scissors
Pencil
Mirror
First you must plan your animation, what do you want to happen in the animation?
Draw a circle that just touches the edges with the protractor
Use a ruler and protractor to divide the circle into 12 sections: 30 degrees for each wedge. Each wedge represents a part of the animation or;
8 Wedges = 45 Degrees
9 Wedges = 40 Degrees
10 Wedges = 36 Degrees
11 Wedges = 33 Degrees.
Cut out the Circle
Cut out small rectangular slots on each separating wedge.
Poke small hole through centre of wheel.
Draw Animation on your animation wheel.
Use pencil and tac, to hold wheel in place and face it towards the mirror.
Enjoy your animation by looking through the slit of the Phenakistoscope.
Our Experience:
As my team and I did not have much time to plan and draw out our animation, we thought it would be more time efficient to use a template off the website and trace the drawing to concentrate on the construction. Here is the link to the template we used: Website Link.
Here is the Phenakistoscope without a mirror mean that the animation loses the illusion of movement.
Here is the finished piece, through a mirror of a cat chasing a bird over a wall:
'Zu3D stop-motion animation software has been developed to give children (and adults) of all ages the freedom to create amazing animated films quickly and easily, in school and at home. Combining an intuitive interface with stunningly powerful features. Educational & fun!' Zu3d (2012)
In this lesson, we were introduced to a popular animation generator known as Zu3D. This animation editor is particularly aimed for students and classrooms however, it is an easy interface for anyone who is interested in stop motion- animation to indulge in. At some points the programme is quite hard to use, managing the audio on the project, and finding certain keys were difficult as nothing was clearly labelled. however, as time went on I got used to the programme and it is quite enjoyable to use. There is much gratification when you see your image come to life in front of you. It's an entirely new form of expression for the artist. Here is my animation of a flower growing in a garden enjoy:
The Back Story: Its a story of a one armed spaceman, who bravely decides to investigate the deep dark side of the moon. He goes it alone due to some really deep over complicated back story that I just cannot get into right now, then he crash lands on the moon and his ship is broken, he puts the flag down that his wife gave him before he left for his journey. Then he decides to go out and venture forth to the unknown. It is here that he discovers the fun side of gravity and begins to play, until SUDDENLY a strange and bright orb catches his eye. Being so brave... he obviously goes to investigate what this strange terrestrial orb is and then CRACK a crazy mad alien bursts out of his cryogenic sleep and begins to pursue our hero across the unforgiving moon-like terrain. However, our hero misinterpreted what was going on and the alien was actually trying to make friends with our hero. The alien then realises that his ship is broken and decides that he will investigate himself. (The Alien is part of the marrglaar galaxy and is a genius with technology.) So he begins to look at the broken ship and before he's even begun, he hasworked out how to get the rocket started (without our hero inside) and BOOM quick as a flash the rocket is gone.... THE END
This was Sarah's, Jess's and my attempt and stop motion animation. The set was made out of black paper, and the earth was made out of foam. The space ship and the spaceman was part of a lego set. The golden orb we were unsure of it's origin but decided to use it anyway. The monster who chases the hero was also made from lego. Altogether the film took around 2 hours to produce and used approximately 400 photos. The most challenging part of this was the lack of stability for the set and the lighting. The backdrop was very unstable and moved around a lot so it was hard for us to interact with it without some error. The backdrop moved back and forth throughout the animation. The lighting was also a problem, due to it being in a classroom it was difficult for us to isolate some lighting just for the set. There was also natural light through the windows so overall it would have been impossible to have the desired lighting. This also proved a problem for the colour was lost during filming. The backdrop was a deep black, but due to lighting and the camera it appears grey. The colours were not as vivid in the video as they are in real life, so some of the detailing was lost. It also proved difficult applying the audio, as we were inexperienced with the production of a stop motion feature, the 400 photos we captured only provided for a mere 1 minute video. This meant that when we applied audio it was quick and rushed dialogue. The story does not really make any sense, and is very rushed. However, having said all that it was one of the most entertaining and humorous lessons I have ever attended in my many years of mainstream education. This lesson will always be remembered and it inspired a lot of students to indulge in creativity that they never thought they had. From this lesson I learnt about teamwork, problem solving, ICT, Photography, Animation, Script writing, and communication.
During this session it was discussed how much of an impact sound can have on a video. Sound is important for creating atmosphere and mood of the video. Try and imagine watching a scary film without music, or watching Jaws without the musical stylingof John Williams.
This video demonstrates the importance that audio can make to a video. The music gives the audience a sense of urgency and danger. Without the audio this scene falls a little flat. The audio also adds more interest to a scene and creates a better atmosphere.
Here is our false radio show that we have named as 'RadioFace.' Its a local radio show that shares peoples Facebook statuses, Facebook news and facts. The quality is not very good, and there are some background noise throughout the show. It was difficult to keep talking smoothly, and we could not stop laughing!
In such popular 21st century films such as: The Avengers and Harry Potter, the technique known as Chroma-Keying or 'Green-screening' is essential when creating big animations, backgrounds or even large charaters such as Stan Lee's 'The Hulk.' Green Screening allows the filming to be taken in a room and then when shown to an audience, the backdrop can be anything from under the sea, to the deepest parts of space.
Earlier forms of Chroma-keying used a white screen rather than a green or blue one. It did work to some degree however there was a white glow around actors and items. Here is an example of the glow:
This was mine and Jess's attempt at Chroma-keying. As you can see from the video there were technical difficulties when recording. As the lighting was not very good the camera struggled to differentiate from the horse and the background. The green screen was not very bright which also resulted in the camera not picking it up as efficiently as it normally would. Investigating in the potential use of chroma-keying, meant that we were not limited to the classroom when recording our film. We could go into caves, under sea and even in space.
It is also important to mention that animators need to be aware of proportion of props to background. As you can see from the video, when the horse moves away from the camera the background and the horse do not blend very well together. If we were to use chroma-keying in the final piece of work, it is vital that the camera is of high quality and the backdrop is lit
As I was ill, I was unable to attend this session. However, Claymation is a very popular technique and is still used today for films such as: Wallace and Gromit: Nightmare Before Christmas and Coraline. It is a pain staking process that can take hours:weeks even months.
This video is an example of Claymation made by Jessica Lewis and Sarah Fincham.
According to Lowe (2003) animations offer students and learners with dynamic information that is unavailable or implicit from normal images. However,Lowe (2003) also suggests that the use of animation as a learning tool will also use additional and qualitatively different information processing demands on thought processes. According to Lowe (2003) in order for learners to be successful when producing a high quality model from animated instruction, they must be capable of extracting the relevant information and integrate it within their own knowledge. Ainsworth (2008) identifies that animations are a useful and effective way of showing key scientific concepts that would be otherwise difficult to show in reality. However Ainsworth (2008) does not specifically agree that animations have a significant impact on learning.
This was another attempt at stop-motion animation, this time using props. I found the use of props far more difficult than using people.
Animations help educate in many different ways Technical Skills Include;
Photography
ICT
Audio
Lighting
It also helps with life skills such as;
Problem Solving
Team Working
Patience
As we decided that we were going to do the Solar System as our final piece, we tried to animate a 3-d globe. This video shows our attempt at it. However, because of lighting we decided that it would be better to use 2-D objects rather than added another dimension and further complicating the animation.
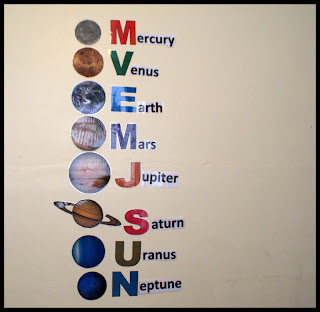
What we did: Sarah, Jess and I decided to get together and discuss our project ideas. During this entire module, we have always favoured the idea of investigating the space module. The Welsh Science Framework for KS2 outlines that students should investigate Space and the Solar System. From this we deduced a creative idea about establish a new mnemonic for remembering the planets names and order because it has been established that Pluto is no longer a planet, so we needed a new one to learn for ourselves also. It was for these reasons that we decided that the Solar System would be an interesting topic for us to use in our Stop-Motion feature.
Preparation is key for any animation project. Jess and I discussed possible drawings, and characters to use in the animation. Originally, there were going to be animated characters, but we decided as a team it would be more time efficient to just start the video from me introducing the sun. Here are some sketches of possible characters we were going to use:
I also did a quick story board of a plan to start the animation. However, we decided to just use people instead of drawings due to time and lack of equipment. One of the hardest challenges we faced was deciding the appropriate mnemonic that we were going to use for our animation. We decided on My Very Energetic Monkey Just Swings Until Needed. We decided to use this because our target audience were young children at key stage 1 and it was also easy to animate. All the planets were printed from small to large, for a zoom effect within the video. We also included the sun because it is the centre of our solar system. We decided to laminate the letters, planets and words for our animation.
On the day of filming we decided to use a white background instead of a green screen as it would reduce technical difficulties in the editing process. We also decided that a white wall would help the planets and myself stand out more, and it also meant that a solid wall was easier to move the planets around on than a sheet of material. The lack of movement of the backdrop meant a more sturdy background and less chance of problems.
The camera that was used was a Sony A200 DSLR camera mounted onto a tripod for a secure filming process. During filming, the camera was not moved and we used a separate trigger mechanism to take the photos to reduce the chance of movement further. We also used a Samsung small compact camera to record the 'Making of...' video.
The Planets.
To the right, is a photo of our representation of the planets and their names. After I introduced each planet and some brief facts in our animation: this part of the video is to reinforce the learning and quickly recap what we had just shown.
The Mnemonic
This image to the left is our mnemonic that will assist children in remembering the planets order and what they are called. We chose this one because the words are not difficult to say or understand.
The Planet and Sun Entrances.
How long it took: Filming took around two hours to make and there were approximately 2000 photos taken in the production of the video. We all took it in turns to take the photos and to move the props but mainly I starred in the animation as the facilitator of learning.
Limitations:
The major limitation during filming was how to animate the monkey on camera. It was difficult as we did not have the appropriate equipment to hoist him properly and move him seamlessly past the camera. Here are some videos showing the three different techniques that we tried when animating the monkey. A possible limitation that we predicted before filming was the lighting. As we were using a room in a house there was a lot of natural light that came through, luckily as the weather was overcast, the production was not effected and we had good photos for our movie. Another problem that arose during filming was the laminate planets. When capturing the images of the laminated planets, the glare came through on the camera meaning that the colour was lost in the final piece.
What would you do different? If we were to do this project again, it would be interesting to experiment more with Chroma-keying. Instead of having a white wall, the background could have actually been space, making the video more interesting and look more professional. We would also use the correct lighting equipment because we may not be so lucky with the lighting next time we filmed. We would also take even more photos than 2000 so the movement would be less staggered.
What went well?
During recording, there were many things that went well. As said previously in this blog, we were lucky with the lighting as the final production was unaffected by light. The movement of the video went well also, although it could be greatly improved I believe that this video is good enough to use for educational purposes. Jess, Sarah and myself also worked very well as a team, we had a clear goal that we wanted to reach and also communicated well during filming and the project as a whole. My favourite part of the film is the different creative entrances that we used for each planet, we theorized that it would create a more interesting and dynamic presentations of the planets than the ones we had researched before filming. Below is a video sneak peak of Mercury's entrance in the film. It was hard to film but it was worth it as it is my favourite entrance!
We had so much fun recording, we thought it would be a good idea to have a Making of Video. We did this because it is interesting to see the behind the scenes as well as the final production. This Video is a perfect representation of the laughs and the fun we had throughout the whole process. I would choose this over writing an essay anyday!
The editing process took the longest. We worked the finished product for approximately 5 hours. We decided to use Zu3d for our animation and sound effects. We imported the images and then edited as needed. As there were too many frames and the video was too long we decided to cut out a few sequences and also shorten some.
The hardest part of editing was getting the audio to match the visual sequencing. The software often stalled, which slowed down the overall process. Apart from this, we worked very well as a team and commincated effectively. Overall, Zu3D was a very good programme to use for basic animation and I can see that using this to embed teaching would make it an effective tool.
Overall, the process was very long but I feel that I enjoyed this far more than writing any essay. Jess, Sarah and I worked very well as a team and spread jobs between us evenily. I believe that the video is dynamic, different and interesting when teaching the planets. Combining Scientific fact with humour, makes for a more interesting video for our target audience.
 Chapter 1: The Journey Begins