 On the day of filming we decided to use a white background instead of a green screen as it would reduce technical difficulties in the editing process. We also decided that a white wall would help the planets and myself stand out more, and it also meant that a solid wall was easier to move the planets around on than a sheet of material. The lack of movement of the backdrop meant a more sturdy background and less chance of problems.
The camera that was used was a Sony A200 DSLR camera mounted onto a tripod for a secure filming process. During filming, the camera was not moved and we used a separate trigger mechanism to take the photos to reduce the chance of movement further. We also used a Samsung small compact camera to record the 'Making of...' video.
 |
| The Planets. |
To the right, is a photo of our representation of the planets and their names. After I introduced each planet and some brief facts in our animation: this part of the video is to reinforce the learning and quickly recap what we had just shown.
 |
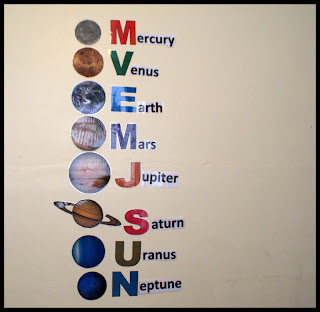
| The Mnemonic |
This image to the left is our mnemonic that will assist children in remembering the planets order and what they are called. We chose this one because the words are not difficult to say or understand.
 |
| The Planet and Sun Entrances. |

How long it took: Filming took around two hours to make and there were approximately 2000 photos taken in the production of the video. We all took it in turns to take the photos and to move the props but mainly I starred in the animation as the facilitator of learning.
Limitations:
The major limitation during filming was how to animate the monkey on camera. It was difficult as we did not have the appropriate equipment to hoist him properly and move him seamlessly past the camera. Here are some videos showing the three different techniques that we tried when animating the monkey.
A possible limitation that we predicted before filming was the lighting. As we were using a room in a house there was a lot of natural light that came through, luckily as the weather was overcast, the production was not effected and we had good photos for our movie. Another problem that arose during filming was the laminate planets. When capturing the images of the laminated planets, the glare came through on the camera meaning that the colour was lost in the final piece.
A possible limitation that we predicted before filming was the lighting. As we were using a room in a house there was a lot of natural light that came through, luckily as the weather was overcast, the production was not effected and we had good photos for our movie. Another problem that arose during filming was the laminate planets. When capturing the images of the laminated planets, the glare came through on the camera meaning that the colour was lost in the final piece.
If we were to do this project again, it would be interesting to experiment more with Chroma-keying. Instead of having a white wall, the background could have actually been space, making the video more interesting and look more professional. We would also use the correct lighting equipment because we may not be so lucky with the lighting next time we filmed. We would also take even more photos than 2000 so the movement would be less staggered.
What went well?
During recording, there were many things that went well. As said previously in this blog, we were lucky with the lighting as the final production was unaffected by light. The movement of the video went well also, although it could be greatly improved I believe that this video is good enough to use for educational purposes. Jess, Sarah and myself also worked very well as a team, we had a clear goal that we wanted to reach and also communicated well during filming and the project as a whole. My favourite part of the film is the different creative entrances that we used for each planet, we theorized that it would create a more interesting and dynamic presentations of the planets than the ones we had researched before filming. Below is a video sneak peak of Mercury's entrance in the film. It was hard to film but it was worth it as it is my favourite entrance!
No comments:
Post a Comment